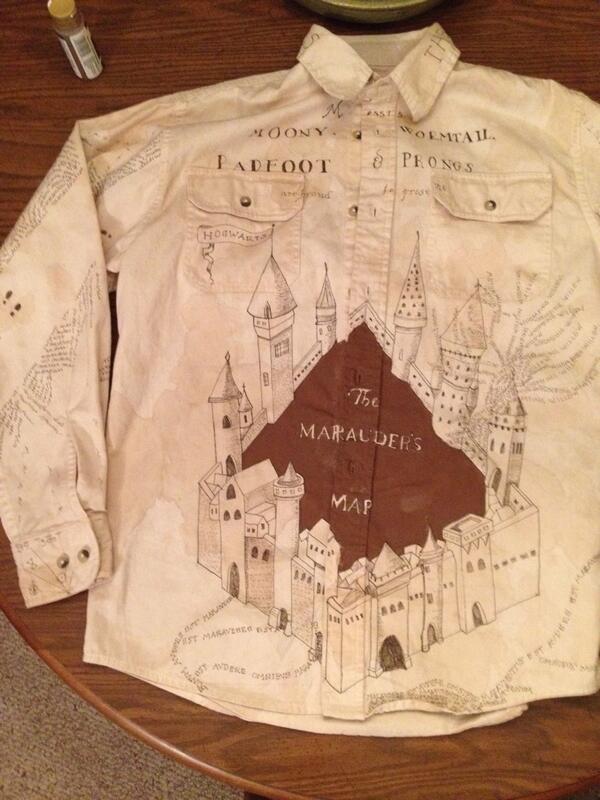
I spent four hours on the floor last night finishing everything off. I touched up the paint along the button band, and then I laid it carefully out on the dining room table and took this picture for you.
I'm just so glad it's finished. I'll never have to work on it again. It is a FINISHED PROJECT.
I am shocked it turned out so well, really. The truth is, I am no artist. This shirt is an aberration. I have no idea how I was able to draw any of this. I am a stick-figure artist. This is so out of my art-league. I am still in shock that it looks decent and is actually wearable.
And now that it's done, I will tell you how to make your own, because I am nice like that AND because I will never be making another one, no matter how much I love you. It was too much, and it stopped being fun about three hours in.
To Make a Marauder's Map Shirt
You will need:
White shirt, dress, tee, etc.
Brown paint
Paint brushes (as tiny as possible)
Paint pens, fine tip
Marauder's Map images for reference
A ruler (or several)
- Prepare your canvas. This means you'll need to obtain a plain white shirt, dress, etc. as cheaply as possible. I picked mine up for about $4.00 at Walmart on big-time clearance. I wanted it to be over-sized, so I went for a men's shirt. WASH IT BEFORE YOU BEGIN.
- Tea-dye your shirt. This is relatively easy to do. You need a big pot, tons of tea bags, and hot water. Here's a tutorial on how to tea-dye things. This was cheap fabric, so it sucked up the dye very evenly, so I went back through and added blotches of tea to make it look aged.
- Get as many images and details of the Marauder's Map as you can find. There are loads of high-quality images on Google you can print out. Use these for reference. I found this map really helpful.
- Plot out where you want different parts of the map to be. I did the detail of the map on the back, close-up hallways and footprints on the sleeves, the front of the map over the front of the shirt, the Marauder's insults to Snape went over the panel just below the collar on the back, the far away view went on the cuffs...you get the idea. Look at each piece of the shirt as a different panel of the map and decorate accordingly.
- Draw out your map. I did this all freehand. I had a ruler to make sure my text was straight, but that was it. You can always use images you find and iron-on transfers for your shirt, but I find they print out nicely, iron on okay, then flake off after a bit of use. Not worth the money. It was way cheaper to buy up a bunch of fabric pens and draw right on the fabric. Make sure you put something (I used cardboard for the sleeves and a plastic mat for the body of the shirt) between the front and back of the shirt so that the ink and paint will not leak through to the other side.
- For the front image of Hogwarts, I drew the school, then added lettering. I used brown paint for the center section. After I painted, I let the shirt dry and outlined the letters again to make them stand out.
Good luck. If you have questions or want advice, leave a comment and I'll do what I can to help!
No comments:
Post a Comment